Course")
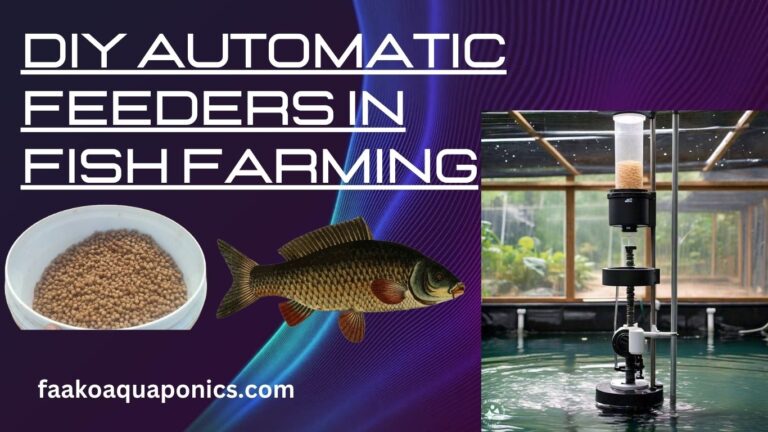
DIY Automatic Feeders is the Do-It-Yourself method of crafting automatic feeders by reducing the cost production.
In the world of aquaculture, efficient feeding practices are essential for ensuring the health and growth of fish. Manual feeding, while traditional, can be time-consuming and inconsistent. Enter the DIY automatic feeder—a game-changer for fish farmers looking to optimize their feeding schedules, reduce labor costs, and enhance the well-being of their aquatic livestock. This blog post will explore the benefits, design principles, and steps to create your automatic feeder for fish farming.
Benefits of Automatic Feeders
1. Consistent Feeding
Automatic feeders ensure that fish are fed at regular intervals, promoting uniform growth and reducing the risk of overfeeding or underfeeding.
2. Labor Savings
Automating the feeding process allows farmers to focus on other important tasks, improving overall farm productivity.
3. Precision
These feeders can be programmed to dispense precise amounts of food, minimizing waste and ensuring optimal nutrition.
4. Convenience
Automatic feeders can be particularly useful for large-scale operations or during periods when manual feeding is not feasible (e.g., holidays or busy seasons).
Design Principles of DIY Automatic Feeders
Creating a DIY automatic feeder involves understanding a few key design principles:
1. Timer Mechanism
A reliable timer is crucial for regulating feeding times. Digital timers are preferred for their precision and flexibility.
2. Food Storage and Dispensing System
The feeder should have a storage container that keeps the feed dry and a dispensing mechanism that can release the food at set intervals.
3. Power Source
Depending on the farm’s setup, the feeder can be powered by electricity, batteries, or solar energy.
4. Durability
Materials used should withstand the farm environment, including exposure to water and weather elements if the feeder is outdoors.
Step-by-Step Guide to Building a DIY Automatic Feeder
Materials Needed
– Large plastic container with a lid (for food storage)
– Digital timer switch
– Small motor (e.g., a motor from an old appliance)
– Plastic tubing or PVC pipe
– Battery pack or solar panel (if not using mains electricity)
– Basic tools (screwdriver, drill, etc.)
Instructions
1. Prepare the Food Storage Container
– Choose a container size based on the amount of feed required.
– Cut a hole at the bottom of the container where the food will be dispensed.
2. Install the Dispensing Mechanism
– Attach the small motor to the hole. The motor will act as the dispenser by rotating and allowing feed to fall through the hole.
– Connect a piece of plastic tubing or PVC pipe to guide the food from the container to the water.
3. Set Up the Timer
– Install the digital timer switch and connect it to the motor. Ensure the timer is programmable to set multiple feeding times throughout the day.
– If using a battery pack or solar panel, connect these to the timer and motor.
4. Calibration and Testing
– Fill the container with fish feed.
– Program the timer to run the motor at desired intervals. Start with short test runs to calibrate the amount of feed dispensed.
– Adjust the timer settings and motor run-time until the desired amount of feed is dispensed consistently.
5. Installation and Maintenance
– Place the feeder securely above the fish pond or tank, ensuring the feed can fall directly into the water.
– Regularly check and clean the feeder to prevent blockages and ensure the motor and timer are functioning correctly.
– Refill the feed container as needed and periodically check the power source.
Tips for Effective Use
– Monitor Fish Response: Initially, observe how the fish respond to the automatic feeder. Adjust feeding times and quantities based on their behavior and growth.
– Maintenance Schedule: Establish a regular maintenance schedule to clean the feeder and check for any issues. This will prolong the feeder’s lifespan and ensure reliable operation.
– Backup Plan: In case of power failures or mechanical issues, have a manual feeding plan in place to ensure the fish are not deprived of food.
Conclusion
DIY automatic feeders are a cost-effective and efficient solution for modern fish farming. By automating the feeding process, fish farmers can ensure their fish are well-nourished and thriving, while also saving time and labor. With a little ingenuity and basic materials, creating a reliable automatic feeder is within reach for any aquaculture enthusiast. Happy farming!